 If you are in for a weekend full of sunshine and barbeque's, I am EXTREMELY jealous. I am in for a weekend of rain, rain, and more rain. BOO. If you are going to be grilling this weekend, why not make this adorable grill for your little ones. You will be shocked when you see how simple, inexpensive, and what this is made out of. I LOVE IT. This is on the list of things to make for my son, well maybe on my husband's list! :) Head on over to Ohdeedoh for the full tutorial. Enjoy your holiday weekend!!

Friday, May 27, 2011
Get the kids in on the fun this holiday: Weekend Website
If you are in for a weekend full of sunshine and barbeque's, I am EXTREMELY jealous. I am in for a weekend of rain, rain, and more rain. BOO. If you are going to be grilling this weekend, why not make this adorable grill for your little ones. You will be shocked when you see how simple, inexpensive, and what this is made out of. I LOVE IT. This is on the list of things to make for my son, well maybe on my husband's list! :) Head on over to Ohdeedoh for the full tutorial. Enjoy your holiday weekend!!
Wednesday, May 25, 2011
One Dollar Wednesday... felt flower tutorial
I LOVE felt and I LOVE flowers. It was inevitable that these two loves of mine would cross paths one day. I have seen so many cute felt flowers around town, and knew that I could throw something together.
I started with my pattern pieces. In this case a drinking cup, and a medicine cup. I used a blue crayola for tracing.

Here are all my circles traced onto the felt. I have five large, four medium, and 4 small.

I cut my circles out.

Then I cut them all in half, with the exception of one large and one small.

I started layering on my large circle, using my glue gun to affix my layers.

Another layer...
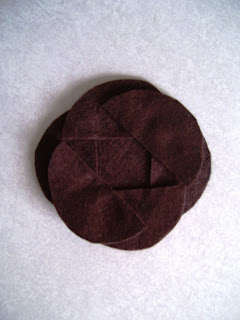
and another...working from large to small.

When I finished with my layers, I put a dollop of glue in the center and finished the layers off with the small circle.

For my clip, I cut one more circle and a little strip of felt.

I glued the strip of felt around the end of my clip, then glued the clip to the bottom of my flower. I finished it off with the small circle.

I added a pretty pink vintage button, and it was good to go!

Monday, May 23, 2011
Bib Towels
It has been raining non stop for a month now. OK, maybe not non stop, but pretty close. We get one nice day and then BAM! five days of rain. I am so over it, I just want some sun. I want to play outside, go swimming, and eat popsicles. One a positive note, (I am trying to be more positive lately) this incessant rain has forced me to clean up the house, move things around, clean out, donate, and get rid of clutter. It also finally gave me no excuse not to find out how to make hand towels into bibs. My friend had her little girl wearing one at M's birthday party and I again thought how I need to get more made. These aren't new, they have been around forever, but since I finally figured out how to make them, I thought I would share. If you know your way around a sewing machine, these babies will take you about 5 minutes. For you non-sewers out there, it may take you a few minutes longer, or you can just cheat like I did, I will explain below.
A couple months ago a nice neighbor brought me this fun bib to church for my sweet babe. I put it on baby M and I was in love! He couldn't take it off, which is what happens with most bibs, and it covered him so well that not a drop of food got on his clothes. Since that never happens I knew I had to make a few more.
 After a fruitful IKEA trip I found some super cute towels for my bibs. I will admit, I splurged. I usually hunt around, find the deal, and love getting something super cute for cheap. This time I just went for the cute, honestly, I didn't have time to hunt for the deal. Splurging ever now and again is OK right? We all do it, or am I alone? Don't worry I saved money on other things, and I stayed within my budget.
I gathered my supplies. I used the blue one as my pattern and I was lucky enough that my Mother-in-law already had some white ribbing, woo woo!
 You take your ribbing fold it in half and measure your baby's head. You want to stretch it a little bit since you will be stretching the bib over the head to put it on your babe.
 Hand towel size is the perfect size for these bibs, I decided to put the neck line 3/4 of the way over, giving more fabric to the front of the bib.
 Fold your towel in half and cut a small circle. Cut it small, a little at a time, constantly trying it on your baby. You DO NOT want to cut it too big, otherwise it won't work with your ribbing and won't fit as well. Cut a little, try it on, cut a little, try it on, until it just barely fits over your baby's head. If your baby is anything like mine, they will absolutely DETEST this process, and try to crawl away from you as fast as possible when they see you with that striped towel.
 Once you have your hole cut out, you just sew in the ribbing, with it still folded in half. Just stich around the ribbing and the towel and it will turn out something like this....
 You take your ribbing fold it in half and measure your baby's head. You want to stretch it a little bit since you will be stretching the bib over the head to put it on your babe.
 Hand towel size is the perfect size for these bibs, I decided to put the neck line 3/4 of the way over, giving more fabric to the front of the bib.
 Fold your towel in half and cut a small circle. Cut it small, a little at a time, constantly trying it on your baby. You DO NOT want to cut it too big, otherwise it won't work with your ribbing and won't fit as well. Cut a little, try it on, cut a little, try it on, until it just barely fits over your baby's head. If your baby is anything like mine, they will absolutely DETEST this process, and try to crawl away from you as fast as possible when they see you with that striped towel.
  Once you have your hole cut out, you just sew in the ribbing, with it still folded in half. Just stich around the ribbing and the towel and it will turn out something like this....
 Confession time, you all know I don't sew, this last part I did not do myself. My Mother-in-law was kind enough to sew the ribbing in for me. Aren't I lucky to have such a nice MIL? It turned out perfect and I love them! Since I splurged, I was only able to make 2, I would like a bunch more. Now I will be on the look out for some bargain ones.
Speaking of my fruitful IKEA trip, I CANNOT wait to show you what else we got. It is amazing, are you intrigued yet?
Wednesday, May 18, 2011
One Dollar Wednesday... Flea Market Fancy
I picked up this cute sweater at the thrift store on dollar day. Cute right? I especially loved the green polka dot ribbon addition. I decided to "fancy" it up a bit.

I cut some strips of fabric, and proceeded to roll some roses.

I glued them all together, but thought they needed just a little something more.

Pinned them to my cardi...

and I was ready to go!


I cut some strips of fabric, and proceeded to roll some roses.

I glued them all together, but thought they needed just a little something more.

Pinned them to my cardi...

and I was ready to go!

Sunday, May 15, 2011
Mouthwatering Chocolate Chip Cookies...
 After the birthday party, I had many requests for my chocolate chip cookie recipe. It has taken me awhile, but finally I am posting it! It is another one of those recipes that has been in my family for years. The only problem with this recipe is that it makes 6 dozen. So, I don't advise making them, unless you are planning on giving half a way, which is usually what I do. If you don't give them away, they are so yummy you will eat all 6 dozen and gain weight! You could attempt to half the recipe, but I have found in baking that doesn't work so well, it alters the chemistry and they don't quite taste the same. The ginger snap recipe also got a lot of inquires, you can find that recipe here.
Chocolate Chip Cookies
Bake in a 350 degree preheated oven for 12-13 minutes. Makes 6 dozen cookies.
-3 cubes butter or margarine
-3 large eggs
-2 TBSP vanilla extract
-2 cups chocolate chips
-1 1/2 cups sugar
-1 1/2 cups brown sugar
-6 cups flour
-1 3/4 TSP baking soda
-1 3/4 baking powder
Cream the sugars and the butter until smooth and a light color. (This part is key, really make sure they are blended, it makes the cookies.) Add eggs and vanilla extract and mix together. Add dry ingredients and mix. Add chocolate chips and mix a final time. Drop spoonfuls or use a cookie scoop and scoop onto cookie sheets.
ENJOY!
Friday, May 13, 2011
A few of my favorite things....
I am in a great mood today, the sun is FINALLY shining and it is warm enough to play outside! While I am waiting for my son to wake up from his nap so we can play outside, I thought I would share a few of my favorite things. I am so funny, the smallest things put my in the best mood!
First up is my BYO lunch bag. I got this for my birthday a month ago and I absolutely LOVE IT! I was a little worried about it not being able to hold enough, but I was wrong. Don't let it's looks fool you, this little baby can hold a ton! I love that it folds up flat and is machine washable. Most of all I love that it is cute and I don't have to carry my lunch around in grocery bags anymore.
 This next little gem still amazes me, someone is truly a genius. It is the spill proof bubble container from Little Kids. My neighbor and I were outside the other day blowing bubbles with our kids and she had one of these. I was amazed at how it didn't spill and how nice the wand was. No sticky bubble messes here. For Easter my son received a giant bottle of bubbles, but it was such a mess, now I just pour it into my spill proof container, no mess! I ran to Target to pick one of these up, well worth my $2.
 I think I have said it before, but nutrition is one area that I am not necessarily a penny pincher. I mean sure, I shop the sales, and on occasion will clip coupons, but I find that the food that usually has coupons, isn't the most nutritious. I am tired of all the added sugar and other things out there, so I try my best to find things with only a couple of ingredients and no added sugar. I came across these Dole fruit cups and I think they are a wonderful snack for my son. All natural fruit juice, no added sugars, and they are diced into the perfect size for a one year old. I can toss them in my diaper bag and they work well on the go. So far I have tried the peaches and pears and they are great!
 These are a few of my favorite things, what are some of yours?
Wednesday, May 11, 2011
What I'm working on Wednesday... ready for summer reading?
I am a stickler for Summer Reading. I insist that my two kids that can read ("the Bigs")read for at least 30 minutes every morning...even in the Summer! I cuddle with the two that can't read ("the babies")and I read a couple of their favorites to them. My "bigs" are getting to the age that they put up a bit of a fight. I stick to my guns, and they are generally happy once they "get into" their books. In an effort to stay ahead of the game, I've been doing a little research about Summer Reading.
Hit the Library...

Our local library has a great Summer Reading program. The kids are always eager to get to the library, as soon as school is out, and get started on the program. It starts early for us, May 26th and continues through July 30th.
Check out bookstores...

Sometimes my kids can't find a book they want at the library. Let's face it, we aren't the only Arizonans using books as an excuse to stay out of the HEAT. When that happens, we head to Half Price Books. They have great deals on books and other media.
Online fun too...

There are lots of "reading reward" programs out there too. Barnes and Noble has a program that allows kids to log the number of books that they read to earn free books. Scholastic also offers a "Summer Challenge" for kids to log the minutes they read to win prizes.
Lastly, I think any crafts that we do that relate to reading help to encourage my kids to read more. Here are a few reading crafts that we will be doing this summer...
A story sack.

What is a story sack? It's simply a tote bag that contains a book, and crafts or games related to that specific book. You could use costumes, treats, puppets, and paints. The possibilities are endless.
An elephant parade garland, courtesy of the long thread.com

This garland is to celebrate Elmer by David McKee. This book is a favorite in our house, and will be read numerous times this summer.
Munch, munch, munch...

I LOVE these page corner bookmarks. What kid wouldn't be excited to open the pages of his book to find a monster munching on it? These cuties are courtesy of I Could Make That. Click on the link above for a full tutorial.
What are your ideas/plans for keeping the kiddos reading this summer?
Monday, May 9, 2011
Bathtub Bookshelf
My son is a book worm, no question. He will choose a book over a toy any day and could sit on your lap for HOURS if you will read to him. He has a great attention span for a one year old and I love that he loves reading. Because he is such a book worm, we have picked up a couple bath tub books for him, my only problem is, how to store them?
I took a trip to the Dollar Tree to see what I could find. Now I am no Dollar Store guru, I wish I had some of Karen's talents and creativity when it comes to Dollar store finds, she is absolutely amazing. I guess I don't have to tell you that, you read this blog, you have seen her One Dollar Wednesdays. So, I picked up these fun green baskets that came in a 3 pack, along with some suction cups. They were PERFECT!
 I love how they have the long holes in the sides, it will let the water run out of the basket and dry out completely. That is a must, so no yucky bacteria grows.
 This project took me all of about 5 minutes. Stick the suction cups to the tub, poke them through the holes of the basket, and DONE.
 We only have a couple books so far, but if we acquire any more I can always use the other 2 baskets. I am kind of funny with my bath toys, since I am such a germaphobe. My other bath toys have a MAX life of 90 days. I wash them once a week and try to get them completely dried out. If not, I toss them, I haven't bought any of them, we have received them as gifts. I don't plan on buying any new ones either, he likes playing with the cup better than anything else, and that I just throw in the dishwasher. The books I wash once a week with my dish soap/vinegar combo to kill any bacteria, as well as a run under hot water after each use.
 I am sure my son will be super excited about his new book shelf when we take a bath tonight!
Friday, May 6, 2011
Teacher Appreciation Gift
It's Teacher Appreciation week, and I've spent lots of time in the candy aisle of the supermarket to try to come up with something. There are so many options in the candy aisle, I love it! This is what I came up with.
I started with these pasta sauce jars.

The lids needed a makeover, so they visited The Spray Paint Place.

I bought a few packages of gum, and arranged them to my liking in the jars.

I found some scrapbook paper that matched the gum, and some coordinating ribbon. Then I printed out my "saying".

I added a circle of scrapbook paper to the lid to tie everything together.

Lastly, I cut my "saying" to size, and glued it to my scrapbook paper "label". I hot glued this onto my jar, and added the pretty ribbon. ~By "gum" it's nice to have such great teachers~

Thursday, May 5, 2011
Mother's Day Kid's Craft featuring Sally of EatBreatheBlog
We are so excited to have Sally sharing a fun craft with us today. We will let her introduce herself....
My name is Sally, and I am a sucker for a great infomercial or flashy advertisements. When it comes to dieting and fitness, I spend way too much money each month on massages, hair products, diets, food, fitness equipment, personal trainers, and gym memberships. Read my musings on active lifestyles, parenting, and green living on EatBreatheBlog.com.

Making Mother’s Day cards with potato stamps
When you were a kid – or, you know, in your early 30s – you might’ve experienced the joy that is creating art with potato stamps. Yep – a raw potato cut into a design and then dipped in color. A simple, cheap, and easy craft that generates delightful results, especially considering Mother’s Day is rapidly approaching and we’re in a recession. To make your stamps, you’ll need:
Enough potatoes to accommodate your designs. If you purchase more than a truckload, you might want to let Hallmark know they have competition.
A knife that can cut through a raw potato. You can probably use a plastic knife from a fast food restaurant but… don’t.
A pen or marker to sketch out your masterpiece. It’s tempting to get all Picasso with your spud but keep in mind that you need to carefully cut out your design, so start simple. If you end up with a design you didn’t intend, just call it abstract art.
Paint (poster, acrylic, or fabric), ink, or food coloring.
Construction paper, blank notecards, grocery sacks, the backs of window envelopes – whatever you want to stamp your design upon
Ok, let’s do this:
Wash your potato to keep dirt out of your artwork.
Cut the potato in half and blot away the resulting potato juice. (Don’t worry – the potato isn’t crying. It wants to be a part of your opus.)
Sketch out your design on each potato half. Get creative! It’s a little labor intensive, but consider cutting out an “M” and an “O” so you can spell out “MOM” in semi-ransom-note style. You can also sketch flowers, a jesus fish, geometric shapes, or something that will result in a Rorschach print. The world is your…okay, let’s move on.
Cut around the shape you created, no more than ½” into the potato, so that your design is raised from the rest of the potato surface. If you mess up, put your starchy buddy aside and make soup later.
Dip your tater into your color and then get stamp happy. Rinse with water and dry thoroughly when switching colors. Or, again, don’t – it’s your artwork and “abstract” is a nice, broad definition.
This craft will obviously work well for any occasion. Try your hand at birthday cards, design the border of a handwritten letter (another lost art), or create a piece of art to hang in your home. I recommend making the fridge your personal art gallery.
Thanks for sharing such a cute idea and fun craft Sally! Be sure to check out her blog, I love it! I have found tons of great tips to incorporate in my daily life.
Would you like to do a guest post on A lil bird? We would love to have you feature a project, your blog, or anything that strikes your fancy. Email us at alilbird3 (at) gmail (dot) com, we look forward to hearing from you!
Wednesday, May 4, 2011
One Dollar Wednesday... flower clip tutorial
Happy Wednesday! It's been ages since I posted, but I've been running on empty for awhile. Luckily I have my babies. I love my children so much! I hate to send my "bigs" to school every day, because they miss out on the fun the "babies" and I have.
We could do this every day...

brownies and beautiful babies, what's better than that?

Project time...
I have a plethora of artificial flowers from the Dollar Tree, and decided to finally put them to use.
I like to layer my flower clips, I think it just adds a little "something". To do this I got a bunch of flowers that were the same color.

I took my flowers apart. If you don't take these plastic pieces out, they just don't lay right.

I reassembled, or messed with the layers a bit, until I got the look I wanted. Then
glued the layers together with hot glue.

I added a flat bottomed crystal to the center of my flower.

For a more "finished" look, I covered my clip with a bit of ribbon. Just hot glued it all the way around.


Here it is, all finished. The possibilities are endless when layering, and I love these flowers for spring and summer.

Subscribe to:
Comments (Atom)